Getting Started
Installation, setup, and operation guide for Saba-chan, covering runtime architecture and operational behavior.
Getting Started
This document covers the basic installation, setup, and server creation procedures for Saba-chan. For remote integration and issue resolution, refer to the Discord Bot and Troubleshooting documentation.
1. Download & Install
Requirements: Windows 10 or 11 (64-bit), the Microsoft Edge WebView2 Runtime (included with Windows 11 and recent Windows 10), and an internet connection. Linux and macOS are not supported yet (coming soon).
- Download the installer
saba-chan-installer.exefrom the download button on the website or from GitHub Releases. - Run the installer, choose the install location, the game modules to install first, and the shortcut options, then click
Install.- The default install location is
C:\Program Files\Saba-chan. If you pick a folder that already contains other files, the installer creates aSaba-chanfolder inside it. - You can also add game modules later from the app.
- The default install location is
- The installer configures the following components. Depending on your network connection, this may take a few minutes.
- Checks the latest signed release, then downloads and deploys the daemon, GUI, CLI, updater, locales, and other components (every file is hash-checked)
- Installs the selected game modules and the extensions they require (e.g. SteamCMD)
- Downloads portable Python and creates a
venvenvironment (installed in a Saba-chan folder; the systemPATHis not changed) - Records the installed component versions in
installed-manifest.json
- When installation finishes, click
Launch Saba-chanto open the GUI. You can also start it from the desktop or Start menu shortcut.
Settings, game server files, worlds, and backups are stored in %APPDATA%\saba-chan. Deleting the program folder does not remove your server data.
Reinstalling: If installation failed partway or files are damaged, run the installer again. It downloads the program files again, and deletes and re-downloads a damaged Python runtime. Your settings and server data are kept. An installer older than the current release is blocked, so always download the latest installer.
2. Understanding the Saba-chan Architecture
The following diagram illustrates the relationship between Saba-chan components and their communication flow:
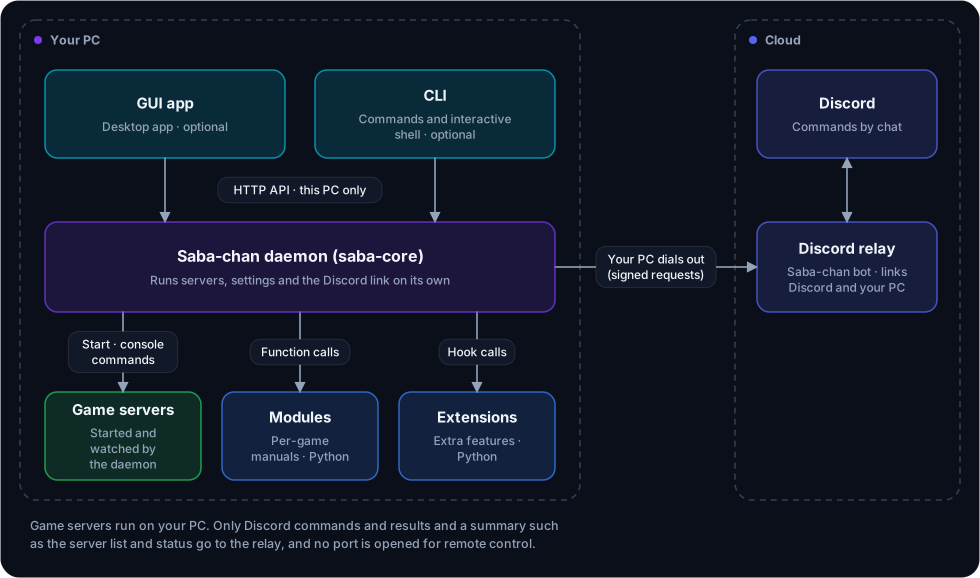
- Daemon (
saba-core.exe) — The core that performs every Saba-chan feature. It runs and manages server processes, collects logs, and exposes an HTTP API only on the local address127.0.0.1:57474. - GUI — The desktop app that calls the daemon API.
- CLI — The command-line tool that calls the daemon API. Run without arguments, it opens an interactive shell.
- Runner (
saba-runner) — A small watcher process attached to each server. It keeps the server console and logs continuous even when the daemon restarts. - Relay server — The cloud service where the Discord bot runs. After pairing, the daemon connects outward (long-polling) to receive Discord management commands, authenticating every request over HTTPS with the node token it received at pairing. The relay only carries Discord commands, their results and server summaries, not game traffic, so network access for players joining the game must be configured separately.
Game servers run on your own PC. The GUI and CLI only send requests to the daemon; they never edit files or start processes themselves.
Closing the window with 'Exit Interface' keeps the daemon and game servers running in the background. Reopening the GUI reconnects to the daemon and picks up the existing server state and console logs. If the daemon restarts, it re-attaches to existing running server processes to resume monitoring (processes terminated by power loss or system reboots are not restored). To stop an individual game server, click
Stopin the interface.
3. Creating Your First Server (using the GUI)
When Saba-chan is launched for the first time, the server list is empty and a 'Next step' card guides you through installing a game module and creating your first server. If no game module is installed yet, install one from Saba Storage in the app first. Then follow these steps to create a server:
- Add a server — Click
Add Serverand chooseNew Server. To link a server folder you already use, chooseImport Existing Serverinstead. - Choose a game — Select one of the installed game modules (official modules: Minecraft, Palworld, and Project Zomboid).
- Set up the server — Enter a server name and fill in any options the module asks for (e.g. the Minecraft server type) and the recommended setup. The port is assigned automatically so it does not collide with other servers.
- Agree to terms — For games that require agreeing to terms (EULA), such as Minecraft, you must read the terms and check the box yourself before the server can be created. Saba-chan never accepts terms automatically.
- Start installation — Clicking
Add Servermakes the daemon run the setup tasks in the following order:- Checks the extensions the module requires (e.g. Palworld and Project Zomboid need SteamCMD). If a required extension is turned off, you are prompted to enable it in Settings → Extensions.
- Saves the instance data to the
%APPDATA%\saba-chan\instances\<instance ID>\folder - Runs the
server.post_createhook - Downloads the latest version of the game server files into the instance folder's
server\directory (official server download for Minecraft, SteamCMD for Palworld and Project Zomboid). Progress is shown on the progress bar.
- Start — When you click
Start, the daemon checks term agreements and runs pre-start checks, runs theserver.pre_starthook, and then launches the process with the module's launch command (get_launch_command). Server console output is shown live in the GUI console.
Every game command goes through the daemon to the server console (stdin). Saba-chan runs games with RCON turned off; Palworld uses the game's REST API.
4. Behavior to know during operation
4.1 Stop timeout
For processes directly managed by the daemon, when the user clicks Stop, the daemon attempts shutdown in the following order. Configuration values are defined in src/supervisor/mod.rs.
- Graceful stop: Sends the module's
stop_command(e.g., Minecraftstop, Zomboidquit) to the server console (stdin). For a game without console input (Palworld), the module asks the server to save and shut down through the REST API. The daemon then waits for the module-specific timeout (30 seconds by default, configured via[config].stop_timeoutinmodule.toml). If the timeout is exceeded, the daemon forcibly terminates the process and waits an additional 2 seconds. - Force kill: On forced termination, the process tree is killed immediately followed by a wait of up to 5 seconds.
- Stop cooldown: For 30 seconds after stopping, automatic process detection is suppressed to prevent normal termination from being registered as a crash.
4.2 Crash handling
When a server exits, the daemon classifies the cause as Stopped by you, Stopped in game, Crash, or Unknown, and records it in the server's 'Recent exits' list. An exit is classified as a crash only when there is evidence such as an abnormal exit code or a crash file the module declares; without evidence it is not treated as a crash.
- Auto restart: Turn it on or off under 'Auto restart' in the server settings.
Restart after a crashis on by default, andAlso restart on unknown exitsis off by default. Servers you stopped yourself or stopped from inside the game are never restarted. - Restart interval: The first restart happens after 5 seconds, and the wait doubles with each restart. After more than 3 restarts within 10 minutes, Saba-chan gives up; check the logs and start the server manually.
4.3 Log location
- GUI logs:
%APPDATA%\saba-chan\logs\(output from a daemon started by the GUI is recorded here too). You can also view daemon logs withsaba-chan-cli daemon logs. - Server console logs:
%APPDATA%\saba-chan\instances\<instance ID>\logs\. Servers run through the runner create a file undersessions\for each run and keep 20 by default. - Console view: The daemon keeps the most recent 10,000 lines per instance in memory. The GUI polls the endpoint
GET /api/instance/:id/console?since=…with a cursor, up to its display limitconsoleBufferSize(default 2000 lines).
5. Next Steps
- Day-to-day operation such as starting and stopping servers, backups, and scheduled tasks: Managing Your Servers
- Managing servers remotely via Discord commands: Discord Bot & Cloud Relay
- Configuring the settings file (
config.json): Configuration File Guide - Troubleshooting common errors: Troubleshooting
- Developing custom game modules: Module Development Guide